Get to Know the AudioMoth
The AudioMoth is a low-cost, full-spectrum acoustic recording device. The AudioMoth can listen at audible frequencies, well into ultrasonic frequencies. It is capable of recording uncompressed audio to a microSD card at rates from 8,000 to 384,000 samples per second and can be converted into a full-spectrum USB microphone. You can learn more about the AudioMoth’s technical specifications on the Open Acoustic Devices website. The AudioMoth in your Eclipse Soundscapes (ES) Data Collection kit has been outfitted with bump dots to help you find all of the important switches and buttons on the device.
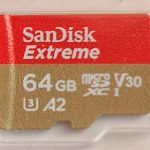
The AudioMoth uses an extreme UHS Speed Class 3 (U3) microSDXC card. The U3 classification means that the write speed to the card is fast enough to keep up with the AudioMoth. Click here to check out the Open Acoustic Devices Memory Card Buying Guide.
AudioMoth Bump Dots Tour
This is the AudioMoth Bump Dots Tour. Please pick up your AudioMoth recording device and follow along to take a tactile tour of the device’s components. As you read, hold the AudioMoth and feel for the parts being described.
AudioMoth Bottom
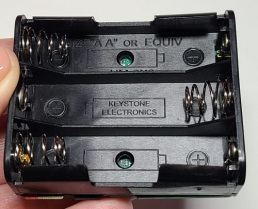
The bottom of your AudioMoth has a plastic battery case or holder with an opening for 3 AA batteries. You shouldn’t insert the batteries until you are ready to set up the AudioMoth 1-2 weeks before the eclipse.
AudioMoth Top
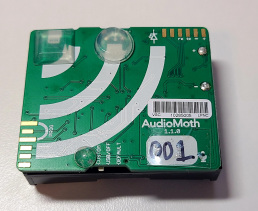
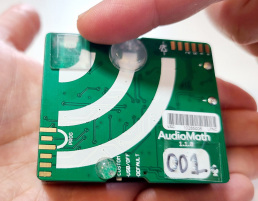
The top of your AudioMoth is a thin credit card sized metal circuit board attached to the plastic battery holder. This circuit board has 3 rubbery silicone bump dots attached to it; one large square with a flat top, one large circle with a flat top, and one small circle with a rounded top. You might also feel some of the metal circuitry bumps and grooves on the top of the AudioMoth. Don’t worry about these smaller circuitry elements. We will focus on using the 3 rubbery bump dots as guides to help us find important parts of this device.
Orient the AudioMoth
To orient your AudioMoth before looking for a switch or port, you should always start by placing your AudioMoth battery side down. Then feel around on the top of the circuit board for the large square bump dot. The square bump dot should be positioned in the top left corner.
The Switch
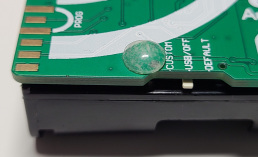
With the square bump dot positioned at the top left, find the small circle bump dot with the rounded top near the bottom edge. The switch is along the bottom edge next to the rounded bump dot. Feel the along the side edge of the circuit board near the rounded bump dot. There is an indent or divot along that edge. The tiny switch is located just below that divot in between the circuit board and the plastic battery case. You might have to run your finger nail along that divot to find the tiny switch.
The switch has 3 settings: Custom, USB/Off, and Default. Custom is closest to the bump dot. USB/Off is in the middle. Default is furthest away from the bump dot.
For now you will need to set the switch on “USB/Off,” which is the middle setting. On the day that you leave your AudioMoth to record eclipse data, you will set this switch on “default,” which is the setting furthest away from the small circle bump dot to start recording.
Micro-SD Card
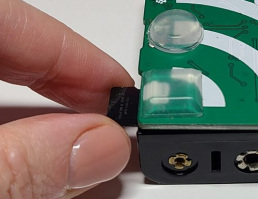
With the square bump dot positioned at the top left, the MicroSd card port is located on the top edge near the square bump dot. The top circuit board edge has indents. The MicroSD card port is in between the circuit board edge and the plastic battery holder directly next to the square bump dot. When a MicroSD card is inserted it sticks out a little. When you push on an inserted MicroSD card it will click and partially pop out. You do NOT want to remove the MicroSD card. You should push the MicroSD back into the device. You will hear a click when you push the MicroSD card back into the device. [If you receive an AudioMoth from the ES team, it will have MicroSd card already installed. Purchased AudioMoth do NOT come with a MicroSD card.]
Mini USB Port
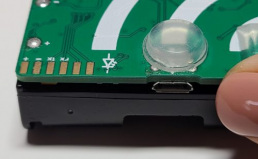
With the square bump dot positioned in the top left, the Micro USB port is on the top edge. Feel for the large circle bump dot with the flat top. Feel for the indent on the edge of the circuit board directly above the round bump dot with the flat top. The Micro USB port is located within that indent in between the plastic battery case and the circuit board. You won’t need to use the Micro USB port for this project, but it is good to know where it is for future use!