Skip to Main Content
Eclipse Soundscapes Logo
  • ES Project
    • About the Project
    • The Science
    • Our Team
  • Your Data in Action
    • Open Data Policy
  • ES Learning Community
  • Receive Updates
  • Volunteer Roles
    • Roles Overview
    • Apprentice Role
    • Observer Role
    • Data Collector Role
  • Resources
    • Blog
    • Eclipse Location Tool
    • Educator Resources
    • Media Kit
    • External Eclipse Resources
    • FAQ
  • Contact us
  • Español

AudioMoth Flashing Instructions

Data Collector Home

If you received an AudioMoth from the Eclipse Soundscapes team or one of our partners, you do NOT need to flash your AudioMoth. Your AudioMoth was already flashed with the necessary firmware by the ES team. This step is only for ES participants who purchased their own AudioMoth.

AudioMoth devices need to have the firmware update to properly set the AudioMoth’s clock with the Time Chime. This page explains how to download the firmware. So that all AudioMoths are flashed with the same firmware update, we are asking participants to use version 1.8.1 or 1.8.2

*Install your MicroSD card before you flash your AudioMoth*

Screenshot of the text and buttons that offer macOS, Windows, and Linux as options for application download.

Step 1: Download the AudioMoth Flash Application

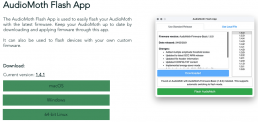
Visit https://www.openacousticdevices.info/applications to download the “AudioMoth Flash App.” The Flash app is the second app on the webpage.

application icon on the left with an arrow in the middle pointing to the right at a folder that says applications.

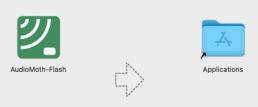
Step 2: Follow your computer's instructions to install the application.

A green square with white audiowaves on it and text that says AudioMoth-Flash

Step 3: Open the AudioMoth Flash Application

Screenshot of the open AudioMoth Flash application showing a list of versions on the right side and a blue download button in the lower middle.

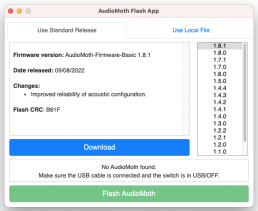
Step 4: Select firmware version 1.8.1 in the menu on the right and click on the download button.

AudioMoth Device connected via USB cord to laptop. USB port on AudioMoth located on the edge of the device next to the flat round bump dot.

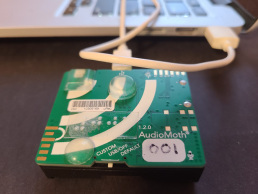
Step 5: Insert the MicroSD card into your AudioMoth, Move AudioMoth Switch to USB/Off, & Connect AudioMoth via USB micro-b cable to your computer

You can connect the AudioMoth with or without batteries. When connected, the light on AudioMoth should be a solid green. (Tip: the AudioMoth can be finicky. Sometimes you have to try a few different cords until you find one that recognizes the AudioMoth, even when the cord works fine with other devices)

screenshot og AudioMoth flash app that says

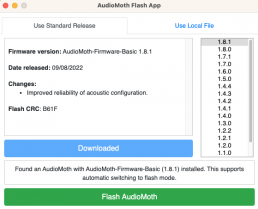
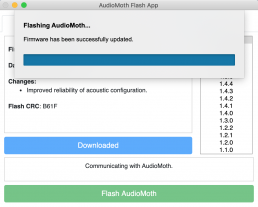
Step 6: Click the "Flash AudioMoth" button

The button will become clickable when the AudioMoth is connected to your computer. The text above the green “Flash AudioMoth” button will also change from “No AudioMoth found” to “Found an AudioMoth…”

Application with message saying

Step 7: Flashing will take a few minutes and the app should let you know once it is complete. Once complete, you can disconnect the AudioMoth. 

Don't forget to set the AudioMoth clock after flashing your AudioMoth!

Don't forget to register your AudioMoth with Eclipse Soundscapes!

Return to top of page

Data Collector Home

Official NASA grantee logo Eclipse Soundscapes is an enterprise of ARISA Lab, LLC and is supported by NASA award No. 80NSSC21M0008. Any opinions, findings, and conclusions or recommendations expressed in this material are those of the author(s) and do not necessarily reflect the views of the National Aeronautics and Space Administration.

Privacy Statement | Terms of Service  | Digital Policy | Open Data Policy 

Privacy Preference Center

Privacy Preferences