Setting the AudioMoth Clock
In order for the audio data you record to have a time stamp with the current time and date, AudioMoth devices must keep track of the current time. When the batteries are removed and power to the device is lost, it is unable to keep track of the time and resets to 01/01/1970 at 00:00. For this reason, whenever the batteries are removed from your device, you must connect set the clock using an acoustic chime. The AudioMoth has LED lights that assist users in understanding if the clock has been set. There are two options for accessing the acoustic chime. You can use the button below on this webpage in step 5 or you can download AudioMoth Chime App. Follow the steps below to set the clock using whichever time chime option you choose.
Accessibility Considerations
The Eclipse Soundscapes Team has added tactile bump dots to the AudioMoths it distributes to support accessibility. Unfortunately the ES team has not determined a way to set the AudioMoth’s clock in a way that doesn’t require both audio and visual cues. We hope that participants can work together with friends, family, and community to complete this step of the AudioMoth set-up. The ES team also asks that Data Collectors write down the time at which they start the data recording and enter it in the online form about location. This way if the clock is not set correctly for any reason, no need to worry, there is a back up!
AudioMoth Not Received from ES Team
If you purchased your own AudioMoth, please make sure to follow the steps to flash your AudioMoth in order to install firmware before setting the AudioMoth’s clock or this process will not work.
Setting Clock with Time Chime Instructions
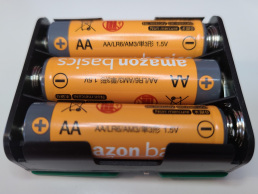
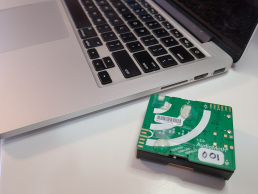
1. Install the 3 AA batteries in your AudioMoth
After you set the AudioMoth clock, you cannot remove the batteries. If the batteries are removed, you must follow these steps again to set the time. You can turn the AudioMoth off AFTER you follow these steps to set the clock. Turning the AudioMoth off is the last step in this process.
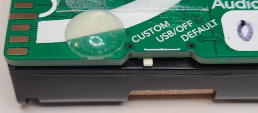
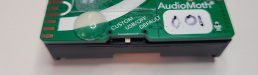
2. Now move the switch to the "custom" position.
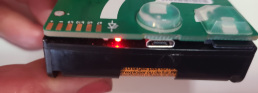
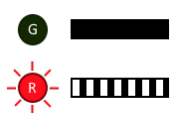
3. The AudioMoth will indicate the clock is NOT set and it is ready with lights
When the clock is NOT set, the Green light flashes and the red light is steady.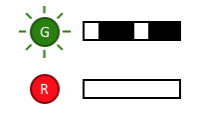
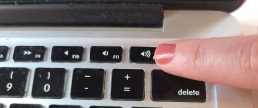
4. Make sure the volume of your device is turned up loud
5. Place or hold the AudioMoth near the speaker of your device or computer and press the time chime button below or from the mobile app.
The button will play a chime twice. It will chime once, briefly pause, then play again. The mobile App will only play the chime once. It might take a few chimes to get the clock set.
Lights While Clock Sets: While the clock is setting the green light will flash faster, and then hold steady for a few seconds and the red light will go dark. Then both lights will turn off, and then both will flash. When just the red light is flashing, the clock is set.
Step 6. Check your AudioMoth's lights to determine if the clock is set
Clock IS Set
With switch on “CUSTOM,” the red light will flash if the clock is set.
Clock is NOT Set
With switch on “CUSTOM,” the red light will be on and steady and the green light will flash if the clock is NOT set.
7. After clock is set, Move the Switch to "USB/OFF"
While in “USB/OFF” mode, the AudioMoth will not record and will use less battery power. It will also not lose the clock settings. If you remove the batteries, you will have to set the clock again.
Troubleshooting
Before the AudioMoths were sent out by the ES team they were flashed with 1.8.1 firmware. This should add a generic recording schedule in the “Custom mode.” We won’t be using this generic schedule as Eclipse Soundscapes Data Collectors will record using “default mode” to record one continuous recording until turned off. But this generic recording schedule should allow for the time clock to be set as the instructions above outline. However, sometimes there are technical glitches. So, here are some steps to try:
- If the time setting process does not work, remove the batteries for a few minutes and try again.
- Flash the AudioMoth with firmware update 1.8.1
- Check out Open Acoustic Devices Support Forum
- Post a question on the EclipseSoundscapes FB page
If none of the above troubleshooting steps above work:
- Confirm that the AudioMoth records when in “default mode.” To do this move switch to default mode and make there is a flashing red light. Then flip switch back to “off/USB” until deployment.
- When deploying, write down the exact minute that you turn the AudioMoth to record. To turn AudioMoth to record you move the switch to “default mode.”
- There is a place to add recording start time in the location notes form on the Data Collector page that Data Collectors fill out after collecting data.
- Mail the MicroSD AND the AudioMoth back to us after the eclipse in the padded envelope. Add a note with start/end recording times, latitude and longitude, and your mailing address so we can mail you a new AudioMoth. This will allow us to manually tag the time on your collected data and also ensure that you have an AudioMoth that you can use a different one for the next 2024 eclipse.
Thank you for your patience, effort, and participation. We appreciate your involvement in NASA eclipse science!
Safeguard / Back-up Plan
The ES team also asks that Data Collectors write down the time at which they start the data recording and enter it in the online form about location. This way if the clock is not set correctly for any reason, no need to worry, there is a back up! The ES team can use what a Data Collector enters as the recording start time to manually adjust the audio file start time.