Field Researcher
On this page you will find information on how to be an Eclipse Soundscapes: Citizen Scientist Field Researcher! Field Researchers will collect sound data for a week along or near the October 14, 2023 Annular Eclipse path or the April 8, 2024 total solar eclipse path. You can find out of you live on or near the eclipse paths here. Field Researchers will place AudioMoth recording devices outside 3 days before the eclipse. Then they will retrieve the AudioMoth 3 days after the eclipse. This will provide scientists with a week of sound data surrounding the eclipse. Finally, they will mail the data back to the Eclipse Soundscapes Team.
The information below is separated into the following sections:
- How to Sign up to be a Field Researcher
- Citizen Scientist Field Researcher Kit
- Get to Know Your AudioMoth
- Finding a Data Collection Location
- AudioMoth Set Up (1-2 weeks before eclipse)
- Collecting Data During the Week of the Eclipse
- Sharing Your Data with Eclipse Soundscapes Scientists
- Field Researcher Frequently Asked Questions (FAQ)
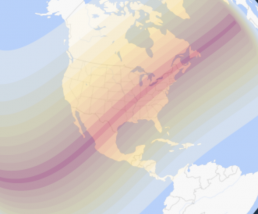
October 14, 2023 Annular Eclipse Path

April 8, 2024 Total Solar Eclipse Path
How to Sign up to be a Field Researcher
We officially launch in 2023. Sign up here to stay informed!
Citizen Scientist Field Researcher Kit
You can put together your own Field Researcher Kit or Sign up here to enter to win a free kit. In order to win a free kit, you will need to submit your Apprentice Certificate to be eligible! Everything you need is listed below.
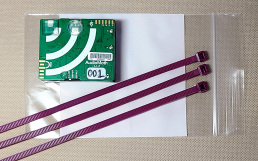
Kit Content
If you received a free Citizen Scientist Field Researcher kit, check to make sure you have all of the items listed here. Or, use this list to make your own! Your kit should include:
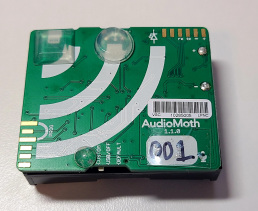
- 1 AudioMoth Recorder
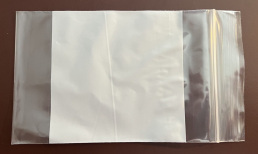
- 1 plastic bag with a zip top lock
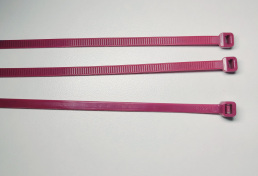
- 3 long plastic zip ties
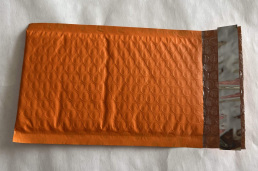
- 1 padded return envelope
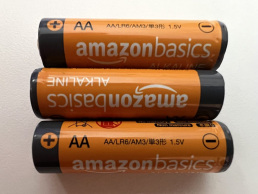
- 3 AA batteries
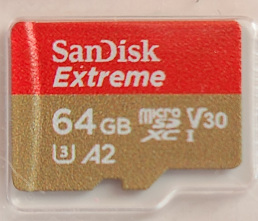
- 1 64 GB MicroSD Card (Already installed in AudioMoth)
If anything is missing from your free kit, contact Help@EclipseSoundscapes.org.
Get to Know Your AudioMoth
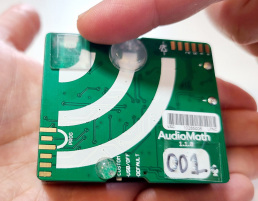
The AudioMoth is a low-cost, full-spectrum acoustic recording device. The AudioMoth can listen at audible frequencies, well into ultrasonic frequencies. It is capable of recording uncompressed audio to microSD card at rates from 8,000 to 384,000 samples per second and can be converted into a full-spectrum USB microphone. You can learn more about the AudioMoth’s technical specifications on the Open Acoustic Devices website. The AudioMoth in your Citizen Scientist Field Researcher kit has been outfitted with bump dots to help you find all of the important switches and buttons on the device.
AudioMoth Bump Dots Tour
This is the AudioMoth Bump Dots Tour. Please pick up your AudioMoth recording device and follow along to take a tactile tour of the device’s components. As you listen or read, hold the AudioMoth and feel for the parts being described.
AudioMoth Bottom
The bottom of your AudioMoth has an opening for 3 AA batteries. You shouldn’t insert the batteries until you are ready to set up the AudioMoth 1-2 weeks before the eclipse.
AudioMoth Top
There are many interesting things to feel on the top of your AudioMoth. The top of your AudioMoth has 3 rubbery silicone bump dots; one large square, one large circle, and one small circle. The top of your AudioMoth also has your AudioMoth’s 3 digit number in print and braille. You will need to record this number in future set-up and recording activities. You might also feel some of the metal circuitry bumps and grooves on the top of the AudioMoth. Don’t worry about these smaller circuitry elements. We will focus on using the 3 rubbery bump dots as guides to help us find important parts of this device. You will use these bump dots to help you find your way and learn about your AudioMoth!
AudioMoth Components
Orient the AudioMoth
With the battery side down on the palm of your hand or on a flat surface, feel the top surface for the large square bump dot. The square bump dot should be positioned in the top left corner. Now, let’s find all of the cool switches and buttons!
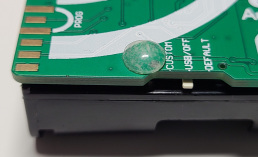
The Switch
On the bottom middle of the AudioMoth’s top surface you will find the small circle bump dot. On the side edge near this small circle bump dot, there is a small indent or divot. In this indent is a tiny switch. The switch has 3 settings: custom, USB/Off, and default. Custom is closest to the bump dot. USB/Off is in the middle. Default is furthest away from the bump dot.
For now you will need to set the switch on “USB/Off,” which is the middle setting. On the day that you leave your AudioMoth to record eclipse data, you will set this switch on “default,” which is the setting furthest away from the small circle bump dot.
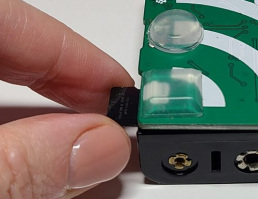
Micro-SD Card
The Micro-SD card is already installed in your AudioMoth. Make sure to keep it in the AudioMoth until after recording sound data. You will be sending this SD card back to us after the eclipse! It is located on the side next to the USB port and next to the large square bump dot.
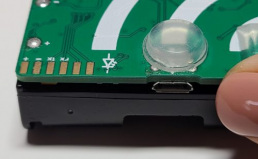
Mini USB Port
The Mini USB port is located on the side of the AudioMoth near the large circle bump dot. You won’t need to use it for this project, but it is good to know where it is!
Finding a Data Collection Location
Looking for a location to put your AudioMoth for the week of the eclipse will be fun! Explore parks, forests, and even your yard to find a tree to hang your AudioMoth. Once you find your location, check to see if you have cell service at that spot. On the day you leave the AudioMoth, you will need to Register its location online. More information about that is in the “Week of the Eclipse – Data Recording” Section further down on this page.
Practicing Active Listening as you look for your location might help you choose a great spot! Check out a cool article by The National Park Service on Deep Listening in the Resources section.
AudioMoth Set Up
Set up your AudioMoth 1-2 weeks before the eclipse. As soon as you install the batteries in your AudioMoth, the power will start draining. So you should wait to install the batteries and set up your AudioMoth no earlier than 1-2 weeks before the eclipse. But, don’t wait until you are at your recording location to set up your AudioMoth. You will need your mobile device and cell service to complete the set up.
1. Install the 3 AA batteries in your AudioMoth
2. Set the AudioMoth's Clock
Directions: Set the AudioMoth Clock by placing your AudioMoth next to your mobile device or computer and playing the “AudioMoth Time Chime” by clicking the button below.
3. Practice "Registering Your AudioMoth's Location"
When you place your AudioMoth outside, you will need to register its location online. Registering your AudioMoth’s location provides us with the latitude and longitude of where you place the AudioMoth and helps us link the data to that location after we receive your Micro-SD card.
After you place your AudioMoth outside and while still at that outside location, you will go to Register the AudioMoth’s location online. As the last step in the AudioMoth set up, you should practice setting the location just as you will on the day you deploy your AudioMoth! Remember to choose “test” this time! Go to www.MyAudioMothLocation.org to practice!
Collecting Data the Week of the Eclipse
You will place your AudioMoth outside 2 days BEFORE the eclipse, visit your AudioMoth’s location on the day of the eclipse during eclipse maximum to take field notes, and collect your AudioMoth 2 days AFTER the eclipse.
- October 12, 2023 – Two Days Before the Eclipse
- October 14, 2023 – The day of the Eclipse
- October 16, 2023 – Two Days After the Eclipse

Two days BEFORE the Eclipse – Start collecting data with your AudioMoth
1. Gather the items from your Field Researcher Kit
From your Field Researcher kit, you will need the AudioMoth, plastic bag, and 3 zip ties. The Micro-SD card is already installed in your AudioMoth. Make sure you have set up the AudioMoth! (If you have not set up your AudioMoth go to AudioMoth Set Up
2. Secure your AudioMoth Outside 2 days before the eclipse
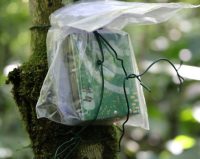
Waterproof your AudioMoth by placing it into the plastic bag and sealing the top. Use the 3 zip times to attach the AudioMoth to a tree or secure location. Do not leave the AudioMoth on the ground.
3. Register your AudioMoth location while AT the location
After you place your AudioMoth outside in its recording location, register its location online at www.MyAudioMothLocation.org.
Registering your AudioMoth’s location provides us with the latitude and longitude of where you place the AudioMoth and helps us link the data to that location after we receive your Micro-SD card.
 Day of the Annular Eclipse – Return to your AudioMoth location during eclipse maximum to observe & take Field Notes
 Day of the Annular Eclipse – Return to your AudioMoth location during eclipse maximum to observe & take Field Notes
Use all of your senses to observe nature as the eclipse occurs! Listen to the soundscape, smell the air, feel the air’s temperature on your skin. Take note of the weather. All of these observations are valuable!
Immediately after the eclipse maximum and while still at your AudioMoth’s location, enter your Eclipse Field Notes here.
Two days AFTER the Annular eclipse – Collect your AudioMoth
 Two days AFTER the Annular eclipse – Collect your AudioMoth
Sharing Your Data with the Eclipse Soundscapes Scientists
STEP 1: Remove the micro-SD Card
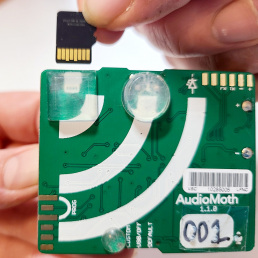
The Micro-SD card is located in a spring loaded mount. It is located on the top side of the top left corner. It is on the side next to the large square bump dot. Push the edge of the micro-SD memory card until you hear a click. The micro-SD card should be released and partially sticking out of the AudioMoth device. You can now carefully pull out the micro-SD card.
(If the micro-SD card does not pop out easily, give it a slight pull. If it still does not come out, give the micro-SD card another, harder push and try again.)
STEP 2: Mail the Micro-SD card to the Eclipse Soundscapes Team
The AudioMoth is for you to keep but we definitely need the SD card!
- Place the micro-SD card in the plastic bag that you used for the AudioMoth.
- Place the plastic bag with the micro-SD card into the smaller pre-addressed bubble envelope. (The kit came in the larger bubble envelope. Don’t use this larger envelope.)
- Seal the smaller bubble envelope Pull the cellophane tab on the envelope flap to reveal the sticky adhesive strip. Press the revealed sticky strip place it in any US Postal Service mailbox. (It already has postage. So no need for stamps.)
- When the Eclipse Soundscapes: Citizen Science Project receives your SD card and puts it into the database we will send you an email telling you that your data is ready to analyze!
Mailing Address:
ARISA Lab, 47 High St Suite 501, Medford, MA 02155